Wednesday, November 21, 2012

The Shadow Box Tutorial (Only 4 steps!!) {Edited}

PLEASE! Come visit me at my new website!
www.rekrahcreative.com
I will also be posting this on there as well... it's one of my favorite tutorials! How could I not?? :)

Good Day Friends!!

Can you believe that it is already 33 days until Christmas!

I have been incredibly busy crafting my heart out! I feel so blessed to have so many people appreciate what I do enough to buy it from me! :)

One of my favorite crafts I have been making a lot of recently is the Shadow Box Variation. I saw it last year on pinterest and made a few that are similar as well as some of my own Creations! Today I am going to share with you how I make them, as I know a lot of people are eager to make their own decorations. (just like me!)

First here are a few pictures:

The first two images are from the original inspiration, a Shadow Box filled with Jingle Bells.
I have added my own flair of course and the boxes I use are 9" squared on the inside...


The Next two images came from walking through the isles in Michael's, 'awwing' and 'ooohing' over how cute the mini tree ornaments are.


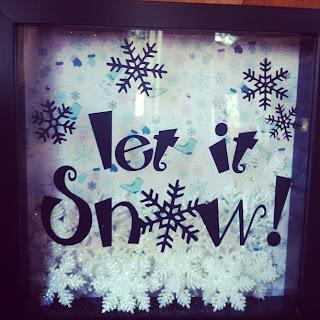
Finally the third variation was designed with my mom in mind who collects all things snow and snowman related.


These are unbelievably easy to make! Albeit a little pricey...
Here is what I do:
1. Gather Supplies:

  • Shadow Box frame  - $10 at ikea, comes in black or white
  • Your choice of scrapbook paper - trimmed to 9" square
  • Vinyl Lettering (Please contact me if you are interested in the designs I have! I can sell you the vinyl, or the design!)  
  •  The Trinkets for each Box;
  •  JINGLE box; 1 1/2 large packages of bells from Michael's (1 pack small 1 pack large bells) and one small pack of sparkly bells
  •  Merry and Bright Box; 1 large box of multicolored mini ornaments, 1 small box of striped/dotted ornaments, (more if you want)
  • Let it Snow Box; 1 package large craft snowflakes, 1 package small crafting snowflakes  
2. Apply Vinyl lettering to outside of shadow box. (If you apply the lettering right after opening the box packaging, you don't need to clean it, otherwise I suggest a quick wipe with Windex)

3. Place box upside down and fill with desired amount of trinkets. 

4. Trim paper to appropriate 9" size, (I usually trim mine closer to 9.25" so it fits firmly in the shadow box) Place behind  the trinkets and close up your box!

Enjoy! Your done!  
These make great gifts but cost me about $30 to make give or take on the box.. 

Please let me know if you have any questions! :) I also sell the boxes completely finished if you are into that. 

Come visit me at my facebook pageI have a few more Shadow Box ideas on the go! ;)


Merry Christmas!
 

Linking HERE:


Skip To My Lou

Sunday, September 30, 2012

Granting Wishes... The Hard Way

Hello Friends!
Today is an odd kind of day. ...

I feel kind of funky; you know where you are not quite grumpy or sad, just offish?
  
Yea. That's me. Today. I have been contemplating the ever popular question lately: To Blog or Not To Blog! I often find myself blogging in my head instead. I realize that gets me nowhere, but in some small weird way I feel like it counts. The truth is I have slipped backed into depression again, and while I am in this state, I tend to do Everything in my head. It's not good.

Anyways, It has been a long time since I last posted and I am feeling guilty. One day I will write all about how I live and work through depression, but right now, I want to focus on some more positive to get myself out of this weird funk I am in.

I find myself wishing for things a lot; things like more time to craft, the desire to workout, to be more spiritual. It seems like it's a part of depression because I don't remember feeling like this before. It's like I want to do something so much I can almost do it. But I don't. I do nothing, well wish. I wish.

Recently I came across this quote "Grant Your Own Wishes; Anything Worth Wishing for is Worth going out and getting for Yourself" I don't remember where I heard it. I tried to find a source and came up with nothing, so if you know where it is from, please tell me!

Anyways, I have decided to make this my mantra to help me feel more motivated to go out and grant my own wishes! To help me on my path, I naturally made a typography print, which is already up in my room. I want to share it as a freebie to all of you who may have issues with depression, motivation or inspiration. I have a sneaky suspicion there are a few out there like me... ;)

To get your Freebie, Just Click on the Image and download/save. Each image is for PERSONAL use only. If your friend loves it, then please send them over! The more the merrier! :)


Find more of my work here: The Periwinkle Pixies on Etsy, Facebook and Twitter!


XO


Monday, September 17, 2012

Real Love Stories Never have Endings

Wanna hear a funny Story?
About two crazy kids who both needed to learn how to kiss? Who Fell in Love? Read on!
Edit Note: This is a post originally from my Sew Seraphic blog


This post is originally inspired by Ashley over at Little Miss Momma. If you have never checked her blog out, you totally should. She is super creative but even more I love her candid honesty in all her posts. It is something that I am striving to do here on my blog as well.

Anyways, on her fab blog she has a cute little post called Our Love Story, and I find it absolutely charming. I remembered that while I was in college I had been asked to write an anecdote about something that had happened in my life. Coincidentally I chose to write about my first date with my then boyfriend - now husband. I thought I would share it all with you, plus I want to make sure that it doesn't get stuffed away and forgotten about. It was a long time ago!

Enjoy and Let me know what you think!

PS-- NO making fun of my Photos! They were taken with a good old point and shoot camera... likely even a one time use Kodak! 

 ************************************** 
The First Date. 

A first date is a funny thing. Of course it depends on the kind of first date you are having; the blind date, the ‘third’ first date, or the first ‘real’ date you have after ‘seeing someone’ for a few weeks. Either way you look at the ‘first date’ situation, you can never really tell what will happen. All you can do is look your best, keep your teeth clean, your breath fresh and pray that you say all the right things at the right time. My ‘first date’ with him was no different.
My stomach was twisting in knots as I anticipated the coming afternoon and evening of my first real date with Brian, the hot new guy I had been seeing. We had been ‘hanging out’ for about two weeks and were now ready to leave the comfort of our friends behind and take the step of a real first date. I was stoked; complete with butterflies, incoherent speech and wide eyes.
Double Daters from Left to Right; Doug, Jessica, Jacinda and Brian
We were making a double date of our first date with my roommate and Brian’s friend, Doug. Waterton National Parks was our destination for the afternoon and evening, (depending on how the day unfolded). I sat with my roommate, Jessica, waiting for our strapping young men to arrive, wondering if I smelled good enough and if I remembered to brush my teeth. Like any girl interested in a guy, I was hoping the date would end well, with a kiss even. After about a half hour, which felt like 10 hours, ‘the men’ pulled up. I managed to calm my stomach enough to say a shaky hello, quickly followed by my best smile. Brian smiled that breathtaking smile of his back and I fell back again into butterflies and incoherent speech.
Roughly 3 hours later, I was comfortably hiking in the beautiful Waterton Lakes National Park and deep in discussion with Brian about roommates and college/university. I hung onto his every word like a lioness watching her prey. The subject didn’t matter as much to me and to be honest, I barely remember any of it now!
On "The Date"
The day and evening were passing like a dream; I was floating on cloud nine the whole time. However, as night grew closer and as our final hike up Bear’s Hump Mountain was coming to an end, my stomach retreated back to butterflies and knots. What was I going to do at the top of the mountain? I knew that was my best chance for a kiss. I wondered; should I make the first move? Or would he? How would I know? I could feel my breath quicken at the thought of our kiss. I realized that I had been expecting it now. My palms became sweatier with each step, and then finally we were there, the top of the mountain. I held my breath as I took in the view of the clear starry night sky, amazed at how beautiful this place really was. From the top of the mountain I could see Waterton’s entire glittering town site below. It seemed small in comparison to the large shadows of the mountains surrounding it. I held my breath in anticipation again as I followed Brian closer to the edge of the mountain where he laid out our blanket and sat down.  This was it, my chance, if any, was now. I had to act.
Taking a deep breath I sat down slowly as close to him as I could and waited. Nothing happened, and a few awkward minutes passed and still nothing. Then almost simultaneously we turned to each other and began the awkward journey of moving our faces and lips closer and closer. I licked my lips about 50 times I think, before mine finally met with his. We parted and looked at each other for a few brief seconds before taking a deep breath and going back in for more. I was hooked; our kiss was a world between the world of the lights of the heavens above and the world of the lights of reality below. I was caught in the middle and that was right where I wanted to be. 
The rest as they say, is history.
Our most Current Photo


XOXO,

The Real Me!

Hi There friends!

First I want to say thanks to those who follow or read my blog...

I have been a little lacking in the motivation department this summer which coincidentally ends up with less blog posts. ha! I am trying to start it again, using the start of the new school year as a new beginnings of sorts.

So I am moving over the posts from my other blog, Sew Seraphic to here though. I can barely handle one blog let alone two. Since this is the one I have the most invested in, I will continue on here;
(this blog also accompanies my little side biz; the Periwinkle Pixies.But more on that later) which means all you wonderful readers get a real taste of me here. As real as it gets as I am using my blog as a way to help me cope with my depression. I hope I don't bore you and I hope those suffer from depression as I do, feel like they are not so alone. I also hope that if you do have depression that you let me know so I don't feel so alone sometimes too! :)

That's all for now! :)


Tuesday, May 8, 2012

The Jump....

Hello All!
As most of you know, I have made a new blog, Sew Seraphic Life, and have been posting on there for the last month now. However, I don't want to let this one get away, so I am moving over to wordpress and will continue to work from there as The Periwinkle Pixies. You can find my new
Wordpress Blog Here.

To be honest,  I am not sure if I will keep Sew Seraphic or not. I may just end up moving everything over there. It's a big change, but I am really excited for it. I have enrolled in a Web Design Course at a local University, which encouraged the push to do this.

Exciting things are happening! 


Wednesday, February 29, 2012

MMMMM... Chocolate....

So I love chocolate.  

When I say that, I really mean is that I go crazy - can't live without - must have or die - need Chocolate to survive. It's bad, but also so delicously good at the same time. I can it all day, any time of day. 
It only made sense that when I came across this recipe that I add it to the MUST EAT NOW list. 

What's the MUST EAT NOW list?

A collection of all my favorite foods that I will regardless of diet, size, color, shape and weight I am in at the current time. It's a good size list, but mostly inlcudes: dark chocolatre, milk and white chocolate, those little conversation hearts from Valentines Day, strawberries in cake or with ice cream or both, white rainbow bit cake, pizza with fresh pineapples and mushrooms, and much much more....

Anywho... back to the recipe... 
You know the kind that hardens after you put it on ice cream? YEA! That one!!!
Except that I am now a Primal Diet (more info here) and do not eat ice cream very much at all. *Little Tear* I didn't let that stop me from enjoying this though! Instead I cut up fresh pineapple, strawberries and raspberries and threw them in the freezer for about 5 minutes. 
The end result as you can see was AWESOME! It tasted so good! I am definitley adding it to The List.
 Here is what I thought Looked "pretty" for my blog...


Here is what mine actually ended up looking like... A nice smooth blanket of dark chocolate over top of those sweet little goodies underneath! I can't help it! I am a REAL Chocoholic! 


XOXO!

Monday, February 27, 2012

Happiness and Finger Paint

Good Day Friends!
I am really sorry for my absence in the bloggin world of late and to make a VERY long story short it has been a difficult winter this year with many challenges for me. 
However, I am learning to keep my head up and find my optimistic side again!

I made this for a YW Lesson a while back and I thought I would share it here too, this quote has made ALL the difference for me and I am really striving to live by it!

It's a high resolution jpeg, so please feel free to save it as a picture on your computer. Just let me know if you have any problems.

In other news, I have opened a dayhome (or home daycare as my state side friends say). It's been an interesting journey! Little kids are so funny!
I have started looking for more fun things to do with them, so if you have any tips, please pass em on! 
In the meantime, we have run out of kids paint. That stuff can get kind of exspensive, so I decided to make some myself and came across this tutorial by Easie Peasie, over at Squish Preschool Ideas facebook.


 If you have little kids, this site is Pure Awesome Sauce!
Anywho, I will keep you posted on how this goes down! :) It could get messy! ;)

xoxo

Monday, February 20, 2012

T Shirt Subway Art {A Tutorial|

If you know me, you know I LOVE Subway Art, 
you also know that I am never settled with "thinking inside the box". I am constantly thinking of new ways to reinvent  myself and stretch my creative talents...
I found this post incomplete and decided that well.....
Better Late than Never!
So here it goes....

I was in charge of the Camp Crafts for our Young Women Church camp this year. Naturally they brought up Subway Art, and I enthusiastically cried said YES! However as the date for Girls Camp grew near, I was really unsettled with having the girls do such a typical paint n mod podge kind of craft. Even though it was Subway Art. Then I met Megan. She too was in charge of the crafts and had thought Subway Art on a T Shirt would be just so cool. Icouldn't agree more!
I tweaked my Subway Art to go to a surface it has never gone before...  

AND I LOVED THE RESULTS!


How have you stretched out of your comfort zone and made something really cool? Blogged about it? Made a tutorial for it? I'd love to hear from you!